Quickly Start#
As a software engineer, I believe that you are full of curious of SmoothCrawler-Cluster and also can’t wait to learn how to use it! This page would show you how easy the usage is. Before start with SmoothCrawler-Cluster, please make sure that you have already installed it.
Before everything …#
In exactly, before start with SmoothCrawler-Cluster, apart from installation, we also need to make sure that activating Zookeeper service which you could access to if we need to quickly start with ZookeeperCrawler. Please refer to how meta data important is in cluster for get more detail why we need it.
Manage meta-data by Zookeeper#
It needs to activate Zookeeper service because the crawler cluster would let Zookeeper to manage its all meta-data. So below are simple tutorial for setup Zookeeper service.
By the way, it suggests to setup and run Zookeeper through container, e.g., Docker.
Activate service in Linux host#
If you want to setup service directly in your environment of host, please make sure that Java has been installed in it.
>>> java -version
openjdk version "1.8.0_345"
OpenJDK Runtime Environment (Zulu 8.64.0.19-CA-macos-aarch64) (build 1.8.0_345-b01)
OpenJDK 64-Bit Server VM (Zulu 8.64.0.19-CA-macos-aarch64) (build 25.345-b01, mixed mode)
And than, we could divide to 2 types of OS runtimes of host to setup: Linux and MacOS.
Linux OS#
Download the latest version of Zookeeper and decompress it.
>>> curl https://dlcdn.apache.org/zookeeper/zookeeper-3.8.0/apache-zookeeper-3.8.0.tar.gz --output /
>>> tar zxvf /apache-zookeeper-3.8.0.tar.gz
In the directory we decompressed, it has everything we need to setup Zookeeper service. We also could find the sample
configuration in directory /apache-zookeeper-3.8.0/conf and file name is zoo_sample.cfg.
Here is another sample config you could use:
dataDir=/data
dataLogDir=/datalog
tickTime=1000000
initLimit=10
syncLimit=6
autopurge.snapRetainCount=3
autopurge.purgeInterval=0
maxClientCnxns=100000000
standaloneEnabled=true
admin.enableServer=true
server.1=localhost:2888:3888;2181
In default, it would try to find the configuration file which names zoo.cfg for activating Zookeeper service, so
we could rename the sample configuration file or create new one and use above example settings.
After we finish preparing of configuration, let’s start to setup Zookeeper service:
>>> bin/zkServer.sh start
It should work finely and doesn’t have any error message. We could use shell which Zookeeper provides to verify its status:
root@d8e0a4b0c3f4:/apache-zookeeper-3.8.0-bin# ./bin/zkServer.sh status
ZooKeeper JMX enabled by default
Using config: /conf/zoo.cfg
Client port found: 2181. Client address: localhost. Client SSL: false.
Mode: standalone
We just quickly start how to use ZookeeperCrawler with Zookeeper, so it’s fine of using standalone mode.
Finally, we could stop the service through below command line:
>>> bin/zkServer.sh stop
Note
Please refer to Zookeeper Documentation to get more detail.
Mac OS#
If you’re a developer and works with MacOS, it’s great to do mostly same things as Linus. However, we would use Homebrew
to install here. So before start this section, please make sure you has been installed it.
Note
For a developer as user of MacOS, I believe you must know what is Homebrew — the greatest tool for user of MacOS
to manage every open source packages or software applications. Please refer to Homebrew document to get more details.
Before run Zookeeper installation by Homebrew, we need to install xcode-select first.
$ xcode-select --install
And we could install Zookeeper by Homebrew very easily:
$ brew install zookeeper
Let’s setup service:
$ zkServer start
Verify the service status:
$ zkServer status
It absolutely could stop the service by command:
$ zkServer stop
Activate service in docker container#
I believe I don’t need to introduce and explain how great and good to use in software development Docker is.
First, we need to download the Docker image of Zookeeper with latest version 3.8.0:
>>> docker pull zookeeper:3.8.0
Verify the image info to make sure we download it correctly:
>>> docker images
REPOSITORY        TAG          IMAGE ID        CREATED         SIZE
zookeeper         3.8.0        7xxxxxxxxxx2    1 minute ago    266MB
Let’s run a container to setup Zookeeper service with the image we has downloaded:
>>> docker run --name some-zookeeper -e ZOO_MAX_CLIENT_CNXNS=100000000 --restart always -p 2181:2181 -d zookeeper:3.8.0
dxxxxxxxxx4
The container would run in background because of option -d. And the option -e means we set a environment variable
ZOO_MAX_CLIENT_CNXNS into container.
Attention
Please remember export the port 2181 to let outside could access to it.
We could verify whether the service in container is accessible or not through tool nc as below usage:
>>> nc -zv localhost 2181
Connection to localhost port 2181 [tcp/eforward] succeeded!
We could check the container brief status through below command:
>>> docker container ps -a
CONTAINER ID   IMAGE             COMMAND                  CREATED       STATUS       PORTS                                                  NAMES
dxxxxxxxxx4   zookeeper:3.8.0   "/docker-entrypoint.…"   1 minute ago   Up 2 minute   2888/tcp, 3888/tcp, 0.0.0.0:2181->2181/tcp, 8080/tcp   some-zookeeper
And if we need, we also could check the log message through option logs:
>>> docker logs -f some-zookeeper
Note
If you’re interesting in the details of Zookeeper, please refer to Zookeeper Docker to get more detail what you want to know.
Start to develop cluster crawler#
ZookeeperCrawler is your good friend#
If you select to start with ZookeeperCrawler, you should have done pre-processing and finally could know how to use SmoothCrawler-Cluster to develop crawler cluster with it.
First of all, we need to import our protagonist of this section — ZookeeperCrawler:
from smoothcrawler_cluster import ZookeeperCrawler
It assumes that we want to build a small crawler system which has 3 crawlers and 2 of them are Runner and another one is
Backup Runner. So let’s instantiate a crawler with option runner=2 and backup=1 (these 2 options are required) as
below:
zk_crawler = ZookeeperCrawler(runner=2,
                              backup=1,
                              zk_hosts="localhost:2181")
If your Zookeeper has been setup in localhost, you could ignore pass option zk_hosts because it would try to connect to
localhost:2181 in default (the default value is None of option zk_hosts). But here we need to show you the clear
settings you need so that we still pass a value at the option.
If you ever use SmoothCrawler before, I believe you won’t forget register every needed components to this crawler:
zk_crawler.register_factory(http_req_sender=RequestsHTTPRequest(),
                            http_resp_parser=RequestsExampleHTTPResponseParser(),
                            data_process=ExampleDataHandler())
todo
You should implement each SmoothCrawler components here. Please refer to how to implement SmoothCrawler’s components to clear what’s the SmoothCrawler component and how to implement it.
Finally, let’s start to run the crawler!
zk_crawler.run()
Caution
If you want to run the crawler continuously, rather run it in a for loop to keep it running, you should use function
run.
However, if you just want to run tasks one by one via loop, e.g., for, etc, you should use processing_crawling_task.
But I really really really doesn’t suggest you to do that because you won’t experience how great SmoothCrawler-Cluster is.
Run as really cluster#
If it according plan, you should never run the crawler cluster successfully. Why? It cannot work because we only run ONE
instance and ZookeeperCrawler has timeout setting in default. Don’t forget, we’re testing the feature of crawler cluster,
so we need to run 3 crawler instances. But before we open multiple terminates to run it, we also have to do one thing —
parameterize the crawler name. If we don’t do that, we would need to have 3 same codes with only different crawler name at
option name.
So let’s parameterize some values with Python library argparse:
import argparse

parser = argparse.ArgumentParser(description="A sample crawler in cluster")
parser.add_argument('--runner', type=int, default=None)
parser.add_argument('--backup', type=int, default=None)
parser.add_argument('--crawler-name', type=str, default="sc-crawler_1")
args = parser.parse_args()

_RUNNER_CRAWLER_VALUE = args.runner
_BACKUP_CRAWLER_VALUE = args.backup
_CRAWLER_NAME = args.crawler_name
Above code could let you run the Python script file with several specific parameters.
Now, please open multiple terminates and run 3 instances with their own parameters.
>>> python3 sample_crawler.py --runner=2 --backup=1 --crawler-name=sc-crawler_1
Attention
Again, each different terminates should run with different crawler name.
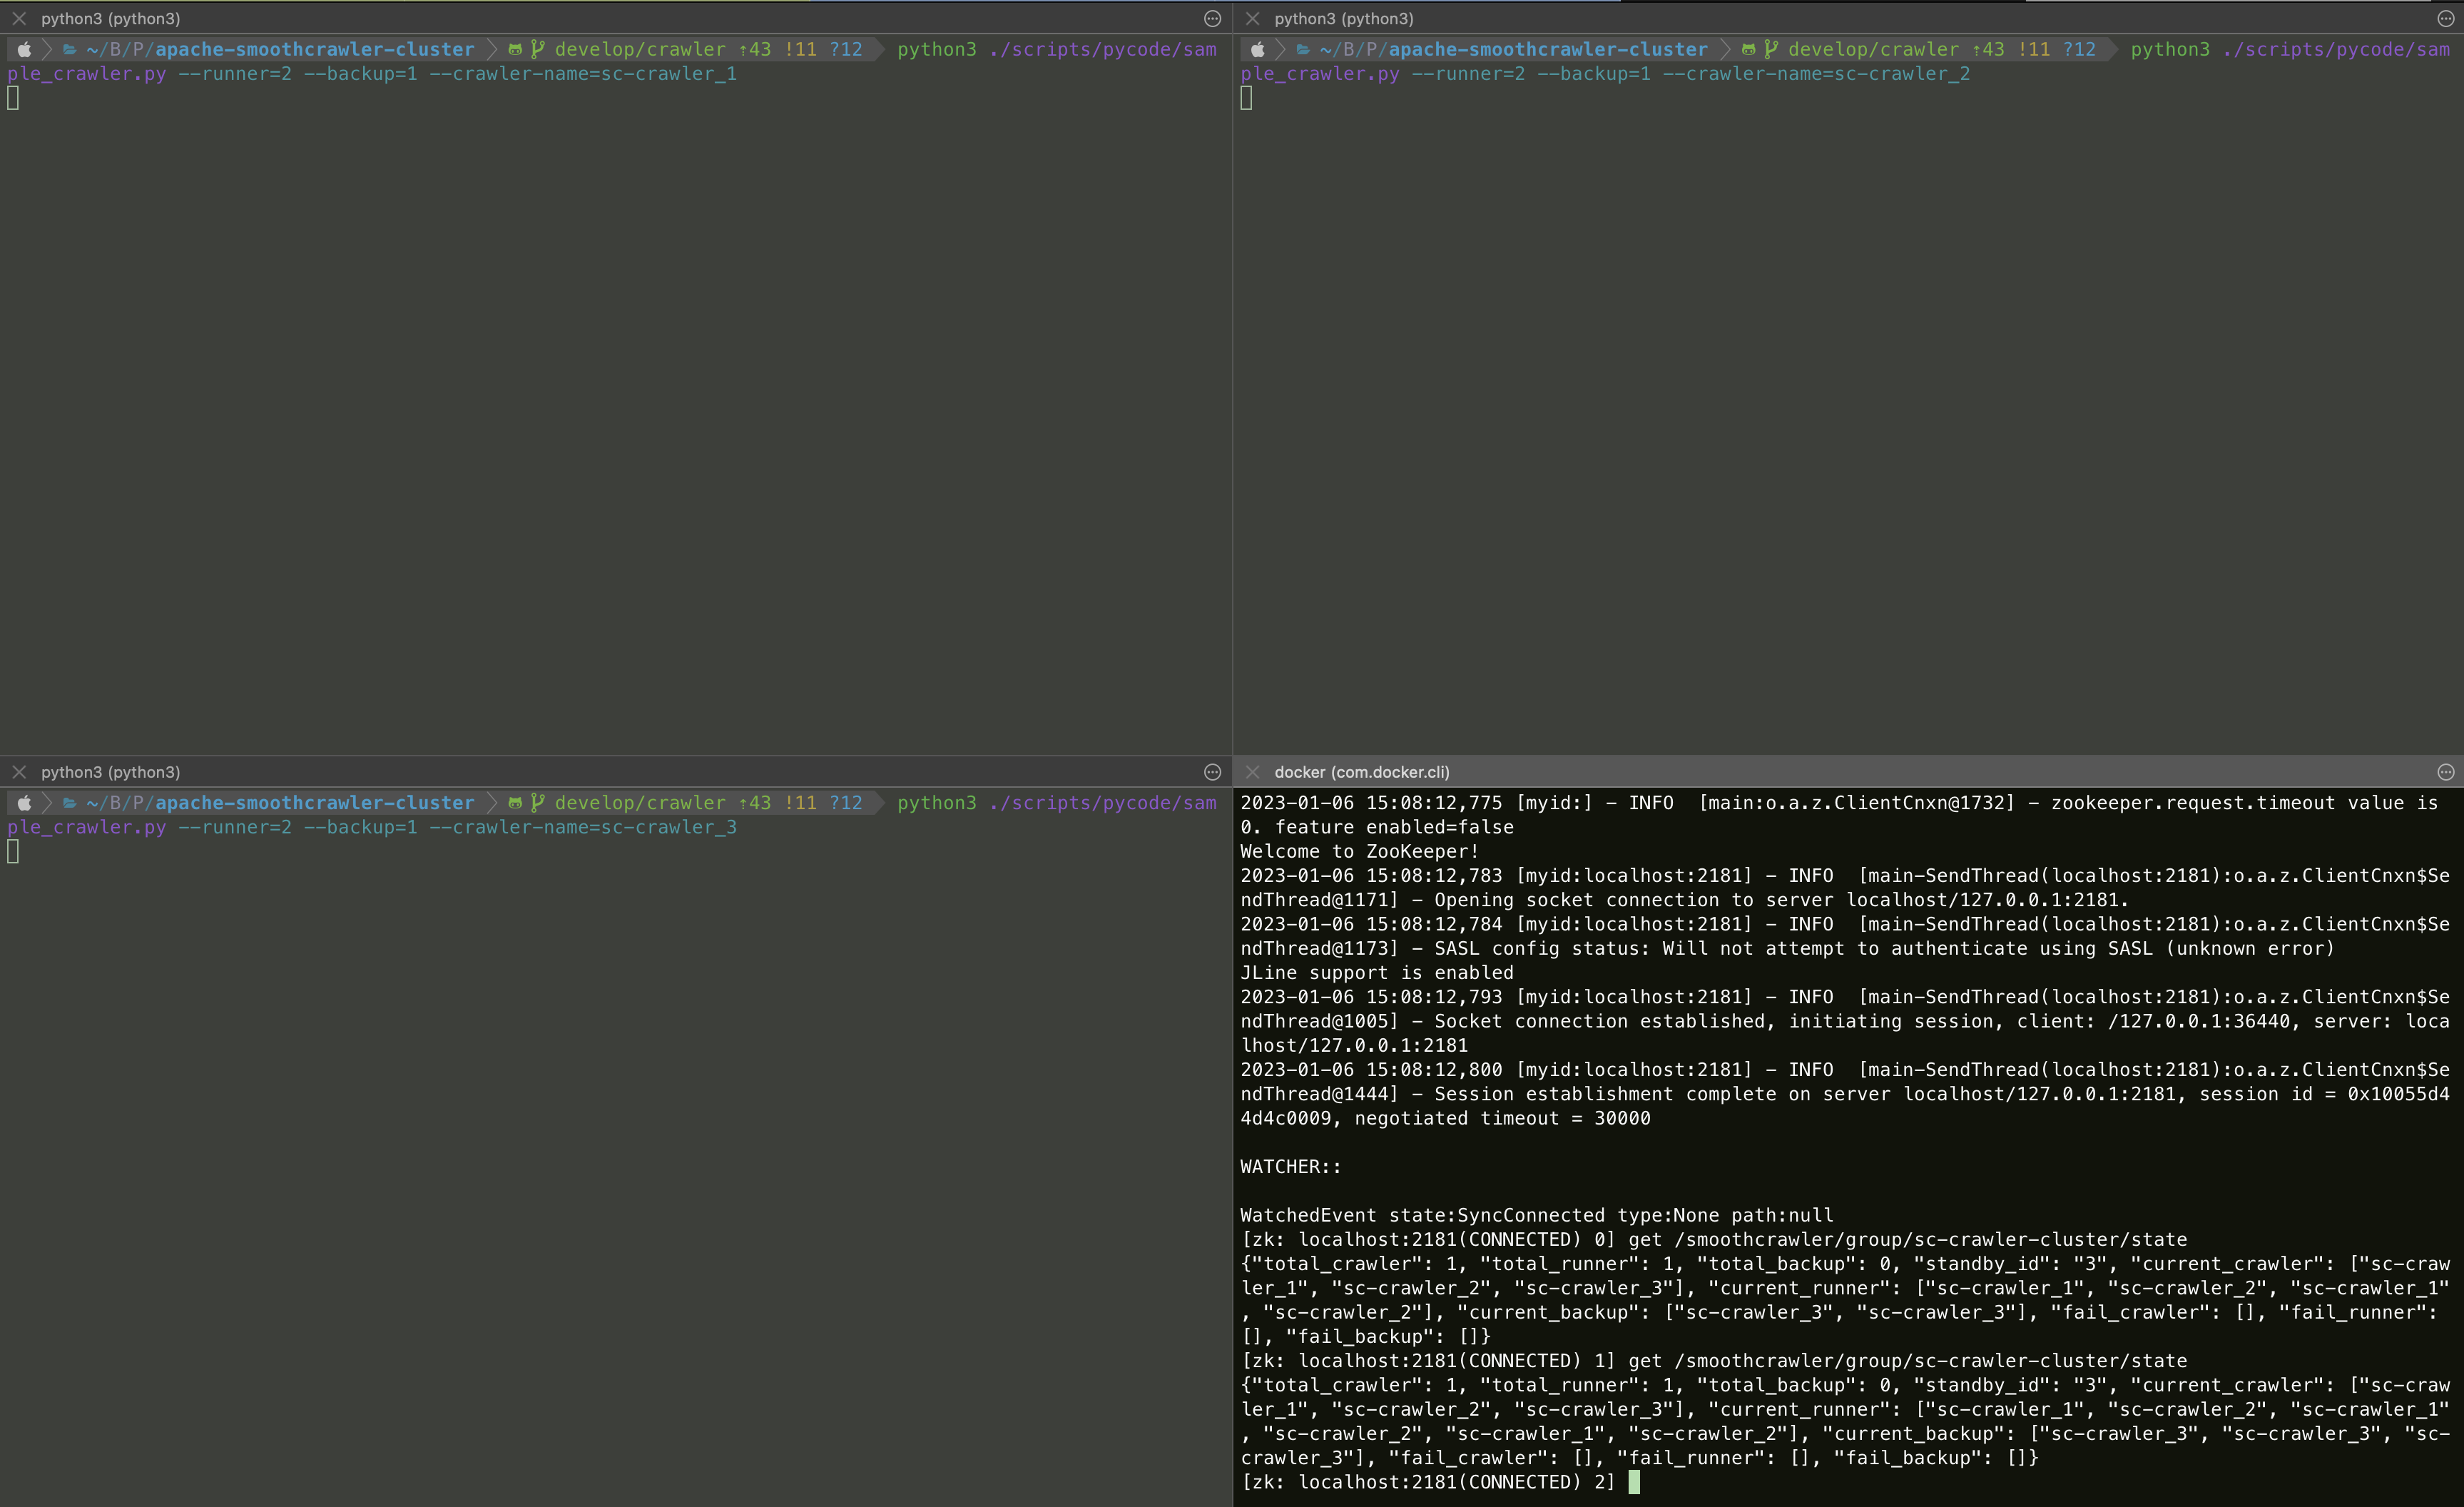
Right now, you should run the crawler cluster successfully and you could verify the meta-data should be saved correctly in Zookeeper.
Let’s check it by Zookeeper client tool.
root@d8e0a4b0c3f4:/apache-zookeeper-3.8.0-bin# ./bin/zkCli.sh
Connecting to localhost:2181
...
Welcome to ZooKeeper!
...
WatchedEvent state:SyncConnected type:None path:null
[zk: localhost:2181(CONNECTED) 0]
First of all, the most important info must be /smoothcrawler/group/<group name>/state because it means the whole cluster
state.
[zk: localhost:2181(CONNECTED) 2] get /smoothcrawler/group/sc-crawler-cluster/state
{"total_crawler": 3, "total_runner": 2, "total_backup": 1, "standby_id": "3", "current_crawler": ["sc-crawler_1", "sc-crawler_2", "sc-crawler_3"], "current_runner": ["sc-crawler_1", "sc-crawler_2", "sc-crawler_1", "sc-crawler_2", "sc-crawler_1", "sc-crawler_2"], "current_backup": ["sc-crawler_3", "sc-crawler_3", "sc-crawler_3"], "fail_crawler": [], "fail_runner": [], "fail_backup": []}
From above info, you could clearly see that total amount of crawler is 3, total amount of Runner role crawler is 2 and they’re sc-crawler_1 and sc-crawler_2, total amount of Backup Runner is 1 and it’s sc-crawler_3.
Therefore, we could make sure that the crawler cluster works finely!
Hint
If you need, you could find the example crawler code here.
Trigger the crawler running#
You may be confuse one thing: so how can I trigger the crawlers to do crawl data from website?
It’s very easy! Just set the task content into Zookeeper node /smoothcrawler/node/<crawler name>/task.
We would need to use kazoo for building session with Zookeeper and Initial and RunningContent for creating a meta-data Task object.
from kazoo.client import KazooClient
from smoothcrawler_cluster.model import Initial, RunningContent
import json
Creating a Task meta-data object:
content = RunningContent(task_id=0, url="https://www.example.com", method="GET", header={}, parameters={}, body={})
task = Initial.task(running_content=[content])
Build a Zookeeper session and set the Task value to one specific crawler, e.g., smoothcrawler/node/sc-crawler_1/task:
client = KazooClient(hosts="localhost:2181")
client.start()
client.set(path="smoothcrawler/node/sc-crawler_1/task", value=bytes(json.dumps(task.to_readable_object()), "utf-8"))
client.close()
Now, you could see that crawler would run the task and update the running result back to meta-data Task. Above one is before run task and below one is after run task, you could observe the different between them:
Before run task
[zk: localhost:2181(CONNECTED) 2] get /smoothcrawler/node/sc-crawler_1/task
{"running_content": [], "cookie": {}, "authorization": {}, "in_progressing_id": "-1", "running_result": {"success_count": 0, "fail_count": 0}, "running_status": "nothing", "result_detail": []}
After run and finish the task
[zk: localhost:2181(CONNECTED) 3] get /smoothcrawler/node/sc-crawler_1/task
{"running_content": [], "cookie": {}, "authorization": {}, "in_progressing_id": "-1", "running_result": {"success_count": 1, "fail_count": 0}, "running_status": "done", "result_detail": [{"task_id": 0, "state": "done", "status_code": 200, "response": "Example Domain", "error_msg": null}]}
You could observe that 3 options has been changed: running_result, running_status and result_detail.
running_result is a statistics of all task running state, here has one success_count because of the task we set.
running_status turn to be done because it receive a task and finish it.
result_detail is the most important option because it records the details of running result. So all what you want would
be here. You could see that it crawling result is Example Domain.
Hint
If you need, you could find the example code of assigning task here.
That’s all how to quickly start with SmoothCrawler-Cluster. Hope you could enjoy it and build your own crawler cluster with it!